Fall Fellows Quilt As You Go - Wall Quilt Class September 17, 2026
Share
$72.00
In stock: 4 available
1
Product details
Brand: AnniesQuiltShoppe
Class date: September 17, 2026, 10:15a - 4:30p
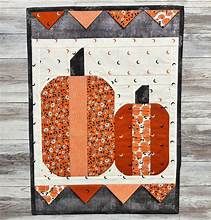
Pattern included in class. Delivered on day of class by Nancy Havrilla. Fall Fellows, pumpkin themed, wall quilt project. The quilt is done with a Quilt As You Go Method.
Supply List (hardcopy also available in shoppe):
Fall will be just around the corner and you will have a cute quilt as you go wall quilt
hanging just in time. You can make this as serious or whimsical as you want, or you can
make it as a Halloween wall hanging. It comes together so quickly, why not make 2! The
finished size is 16” x 22”.
This is a one day class, and you will be provided with all the instructions during class
and lots of time to work on Fall Fellows. The pattern will be provided in class.
This class is for a confident beginner. Below are the supplies and basic fabric cutting
instructions. You will complete more of the wall quilt in class if you cut most of your
fabrics before class.
Fabric Requirements
Fabrics A-E: Fat Eighth of each fabric. (A-D are the Pumpkin fabrics and E is the top
and bottom border fabrics). You can add more fabric if you want to make each pumpkin
segment differently
Fabric F (background): 1/4 yd.
Binding Fabric: 1/4 yd. The pumpkin stems are cut from this fabric. In my class sample
I used a different fabric. If you want to use a different fabric then you will need to cut
One 2” x 3-1/2” rectangle and One 2” x 2-1/2” rectangle.
Backing Fabric: 1/2 yd or 18” x 25” piece.
Fusible batting: 18” x 24” (I tend to have my batting a little bigger by 1” but do are
comfortable). You can use single or double sided fusible based on your preference or
you can use regular batting and have it pre-fused to your backing fabric prior to class.
Cutting Instructions (optional if you want to cut your fabrics prior to class) Be
sure to cut strips from the longer side of the Fat 8th:
•Fabric A: Cut Two 4-1/2” squares and One 2-1/2” x 8-1/2” rectangle.
•Fabric B: Cut Two 4-1/2” squares and Two 2-1/2” x 8-1/2” rectangles.
•Fabric C: Cut Two 4-1/2” squares and One 2-1/2” x 11-1/2” rectangle.
•Fabric D: Cut Two 4-1/2” squares and Two 3-1/2” x 11-1/2” rectangles.
•Fabric E: Cut Two 3-1/2” x 16-1/2” rectangles.
Fall Fellows Supply List 2
•Fabric F: Cut One 3-1/2” strip, subcut into One 3-1/2” x 9-3/4” rectangle and One 3-
1/2” x 3-3/4” rectangle. Reduce the width of the rest of the strip to 2-1/2” and cut Two 2-
1/2” x 2-3/4” rectangles and Four 2-1/2” squares. From the rest of the strip cut Four 2”
squares and one 1-3/4” square.
Cut Two 1-1/2” strips and subcut into Two 1-1/2” x 16-1/2” rectangles, Two 1-1/2” x 14-
1/2” rectangles and One 1-1/2” x 6-1/2” rectangle. From the leftover, cut a 1-1/4” square.
•Binding fabric:
Cut One 2” x 3-1/2” and One 2” x 2-1/2” rectangle (omit if you are using different fabrics
for the pumpkin stems).
From the rest of the fabric, cut Two 2-1/4” strips for binding (you may need a third strip).
Supply list (required):
A ruler large enough to cut your fabrics and a ruler large enough to mark your
batting. Some 24” rulers will be available in class.
Clips or other tool to keep your fabrics organized by letter
Water soluble marker to mark your batting (I do not recommend an iron off
marker)
Sewing Machine in good working order that can sew a scant quarter inch seam.
You will also need a walking foot that will give you a quarter inch seam allowance
or one that will accommodate the ability to move the needle to achieve a quarter
inch seam allowance
Basic sewing supplies: thread (I use a bobbin thread to match my backing),
scissors, pins (sufficient to pin multiple layers of fabric through the batting and
backing), etc
Rotary cutter (45 or 60 mm)
Supply list (optional):
Cutting mat to use by your machine if you need to cut your fabric; if you don’t
have 1, mats are available at class
Mini iron and ironing pad; if you don’t have 1, pressing stations are available at
class
Pen/Paper for notes, you can also write notes on your pattern
I can be reached at nhavrilla99@gmail.com
See you there!
Fall Fellows Supply List 3
PS: bring Show n Tell of a other GE designs projects.
Fall Fellows Quilt As You Go - Wall Quilt Class September 17, 2026
Share